Friday, April 30, 2010

Curiosity Mixed with Fruit Puree

I have one more week of school! My finals are next week and then afterward, I can enter baking mode like crazy! I'm so excited.  Sorry I couldn't post last week; I had an Organic Chemistry exam on Friday then a Histology practical on Monday. It was a terrible week for me.

This week, however, I found some time to bake.  We had a ton of fruit so I threw some strawberries and blackberries into the blender along with a cup of sugar. I liquefied the fruit and strained out the seeds, leaving me with about 2 1/2 cups of smooth and delicious fruit puree.

I actually had no idea what to do with it.  All I knew was I wanted to eat some. So I did. It all started with.. What if I did this? then.. Hmmm, how about this? and the next thing I knew, I had eaten this fruit puree in four different ways.

Fruit Puree Dessert #1: Throw it on Ice Cream
Sorry, no picture here. I was so excited to eat it that I forgot to take a picture!


Fruit Puree Dessert #2: Sugar Cookies with Jelly Centers
This is actually very simple.  First I thickened about 1 cup of fruit puree with 1 Tablespoon of cornstarch.  Then I cut out two cookies with the same cutter, cutting out the center of one of those cookies with a smaller cookie cutter. Baked them and ta-da! cute cookies!

This cookie was baked with a special someone in mind :)

Then I "glued" the cookies together with a bit of royal icing and decorated.

Last, I filled the centers with the cooled fruit.

I love that you can make all kinds of shapes.


Fruit Puree Dessert #3: Mini Pies
I had some leftover cookie dough so I lined a mini-cupcake pan with dough and poured a little bit of fruit in the center.  After they were done baking, I had mini-pies no larger than a strawberry.


The inside

It was really really good.

Fruit Puree Dessert #4:  Mini-Popsicles
After indulging in more calories than I needed, I figured I should freeze the rest of the fruit to keep it fresh. Then I remembered how much I loved to make my own popsicles when I was younger.

I found these tiny cups lying around the house.  
Since they were small enough, I used toothpicks for the popsicle stick.

I used a piece of aluminum foil to hold the stick in place while it was freezing overnight.

The next day, I ran the outside of the cup under cold water for a few seconds. It easily slid out in one perfect popsicle piece.


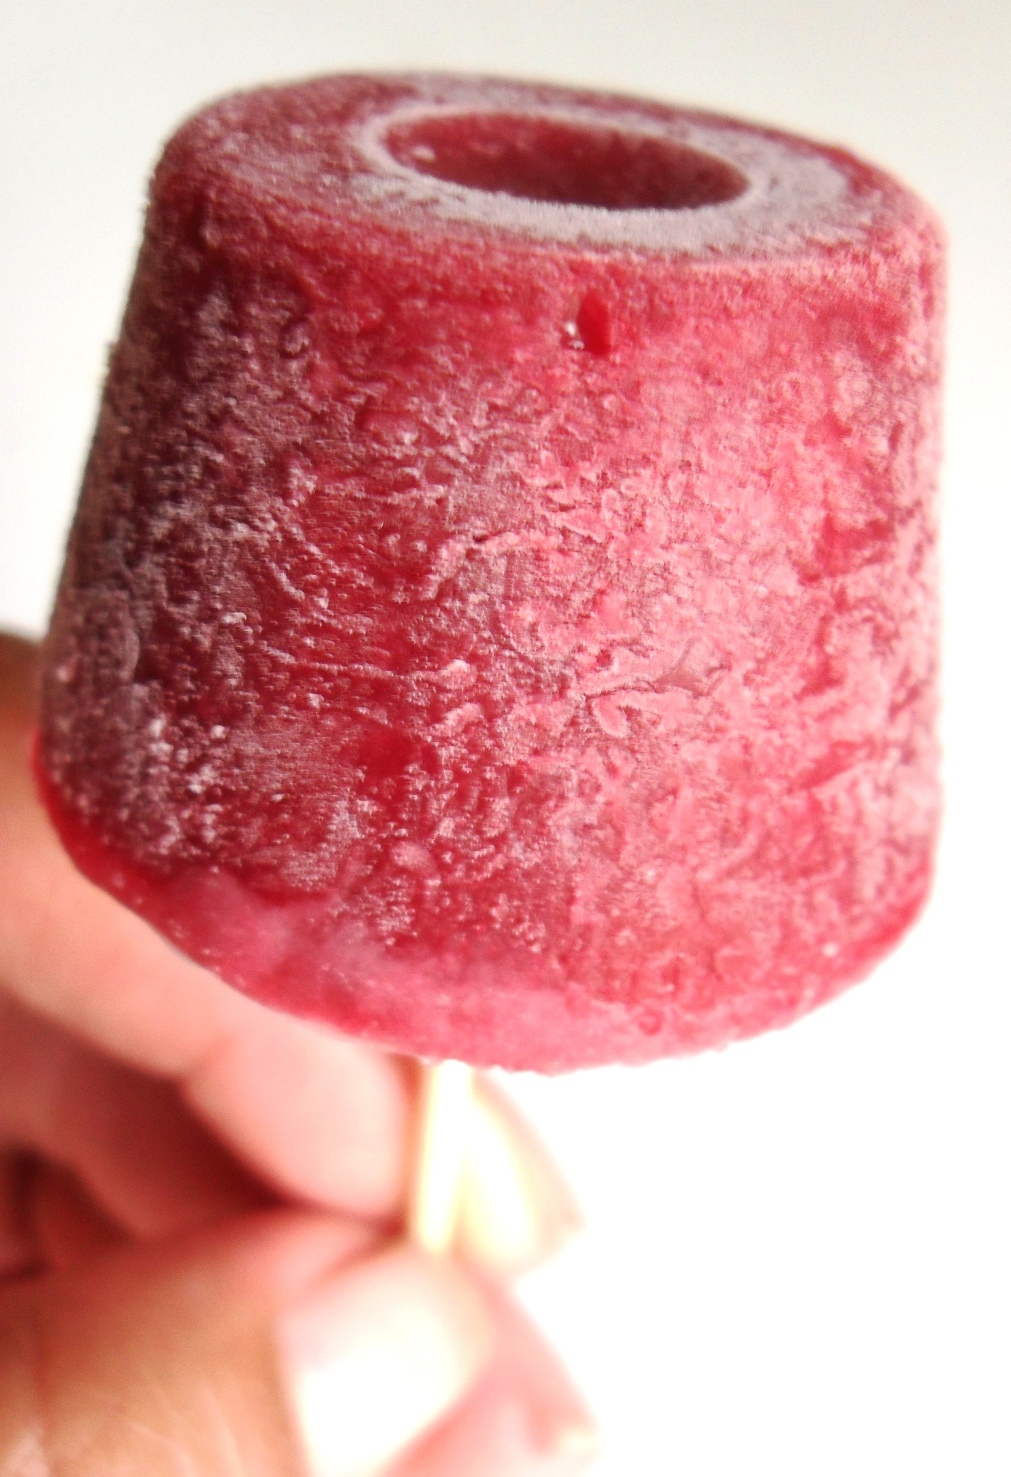
Even my little brother thought they were delicious.


And I hope you do too!

Saturday, April 17, 2010

Brownie-Bottom Cheesecake


Last week was Michael's Customer Appreciation week so I took advantage of their wonderful 50% off any item deal and went back every single day. I even brought my mother and brother along to pay for my items since the policy was "One coupon per customer per day."

One of the items I bought was a mini-springform pan, also known as a cheesecake pan. It's a pan with a latch, allowing you to remove the rim. 


I thought my mini-pan was adorable.


Until it broke.

So I went back to Michael's and replaced it with a different product.  Instead of making one regular cheesecake and one small one, I made one regular and three mini's.

The recipe for this cheesecake is perfect, especially for you brownie lovers. Of the 20+ people that tried it, only one objected. It's great for parties or, if nothing else, just pure indulgence.

Brownie-Bottom Cheesecake

Ingredients
2 oz. bittersweet chocolate
1/4 cup butter (1/2 stick)
1 and 1/2 cup sugar, divided
4 eggs, divided
1/4 cup milk
3/4 Tablespoon vanilla extract, divided
1/4 teaspoon almond extract (optional)
1/2 cup flour
1/4 teaspoon salt
3 packages (8 oz) cream cheese (room temperature)
1/2 cup (4 oz) sour cream

Instructions: Making the crust
Preheat the oven to 325 degrees F. Grease a springform pan with pure vegetable shortening and sprinkle with flour. Turn over and tap to remove excess flour.

Cut the chocolate squares in half and combine in a large microwaveable bowl with the butter. Microwave on high for 1 minute. Remove from the microwave and stir until the chocolate is melted and fully combined with the butter. You should have a smooth mixture.

Add 1/2 cup sugar. Mix well.  With a mixer on low speed, add in 1 egg. Add milk and 1/4 Tablespoon (same as 1 and 1/2 teaspoons) vanilla extract. Combine the flour and salt and slowly add into chocolate mixture.

Spread evenly into prepared springform pan. Bake for 15-20 minutes.

Making the cheesecake
Bring a large pot of water to a boil.  Bring all ingredients down to room temperature.

In a large bowl, beat the cream cheese until smooth and lump free. (Make sure you're using the blocks of cream cheese and not the kind in the tub!)  Add the remaining  3/4 cup sugar, 1/2 Tablespoon of vanilla extract, and 1/4 teaspoon almond extract. Add sour cream and mix well. Add remaining 3 eggs, one at a time, incorporating each egg at low speed.

Triple wrap the bottom and sides of the cheesecake pan with aluminum foil to waterproof it. Pour the cheesecake mixture into the pan.  Place the cheesecake into a large roasting pan and pour the boiling water into the roasting pan until it reaches about halfway up the pan.

Place in the oven and bake at 325 degrees F for 55 minutes to 1 hour, until the center is almost set. Turn off the heat and allow the cheesecake to sit in the oven, with the door closed, for another hour. 

Now, if you're wondering, why can't I set it directly on the oven rack to bake? Well, because cheesecake is more delicate than a regular cake or pie. Baking in a water bath prevents the sides of the cheesecake from baking faster than the center.  Allowing the cheesecake to sit in the oven with the heat off prevents browning and overbaking.

You want a cheesecake like this (my second attempt)...


And NOT like this...

(my first attempt, baked directly on oven rack
with water bath on bottom rack)
See the difference?

After one hour of sitting in the oven, remove and cool completely on a wire rack. Afterward, chill for at least 4 hours or overnight. Before removing the rim, remember to run a thin knife between the edge of the cheesecake and the pan.  When ready to serve, allow to stand at room temperature for 30 minutes.

The original recipe can be found here. I just used a different type of chocolate in my recipe and cut the amount of crust in half. Either way you choose, it still turns out delicious!

Even Pac-Man thinks so ;-)


Open up WIDE and...


Enjoy!

Thursday, April 8, 2010

No-Bake Cheesecake


 As you may know, my little brother is quite the baker. He loves helping me in the kitchen and cries himself to sleep when he can't help me out, which is why I usually start baking after he's knocked out. As wonderful as he is, I work a bit slower with him. We can only bake together when I have a lot of time on my hands.

But one day this week, I randomly remembered a no-bake cheesecake recipe that my aunt gave me eons ago. I think I was 11-ish?

Anyways, here's the recipe, with pictures! :)

No-Bake Cheesecake

1-  8 oz package cream cheese (room temperature)
1-  8 oz tub Cool Whip (room temperature)
1 cup sugar
1 teaspoon vanilla extract
1 ready made graham cracker crust
1 cup fruit topping
   (Need: 1/2 bag frozen fruit + 2 Tablespoons cornstarch + sugar)
Fresh fruit (optional)

Blend cool whip and sugar together on low speed until the sugar dissolves.  Add cream cheese and vanilla extract until smooth and creamy.  Pour into graham cracker crust and spread evenly. Refrigerate for 2 hours.

At this point, it should look something like this.


While it's chilling, you can make the fruit topping. 

First, thaw out a bag of frozen fruit. Then, squish up all the fruits before opening the bag. Pour half of this into a small sauce pot. Then dissolve 2 Tablespoons of cornstarch with a bit of water, mix with the fruit, and add sugar to taste. Last, bring the mixture to a boil for 2-3 minutes or until thickened.

Make sure the fruit topping cools completely before moving on. 


It's really not a thick layer.


Now you can eat as is or garnish with fresh fruit.

Even though this was a berry medley, my brother insisted that we add bananas. So I let him. As long as he cut the bananas himself, I said.

And he did.


I sliced the strawberries and we arranged the fruit in a circular pattern, alternating bananas and strawberries.


Then we put it in the fridge for later, using the convenient plastic cover to protect our creation.


Then "later" came along... 


 and...

OM  NOM NOM.

Delicious.

You can have lots of fun with this recipe by changing up the extract and topping. Though the inside is not as firm as a baked cheesecake, you still get a nice, creamy, easy dessert. It's so easy, a kid could do it. In fact, my 8-year-old brother did all the work this time... minus the strawberry slicing, of course.

Enjoy!

Monday, April 5, 2010

Easter Weekend

It's been a while since I last posted, and after being gone for so long, I realized I probably shouldn't disappear off the face of the Earth without prior notice.  I will try to post regularly from now on.  Let's see how every Friday before noon works out.

Alright, so this weekend was filled with a lot of fun.  First of all, congratulations to my cousin Justin, who recently joined the air force and completed basic training.  He is the first of my cousins to serve in the U.S. military, and we're all extremely proud of him.


To celebrate, I made him a cake with the United States flag and Air Force logo. 


Back of the cake

And from another angle.

Afterward, I had the privilege of baking with the sweetest person in the world, Cathleen. It was a great way to relax after a tough week at school.

We made cake balls and cupcakes. First we made cake balls, but didn't have a spoon to dip them in the chocolate, so we used what we had... a measuring spoon.

Oops, didn't quite turn out as well as we hoped!  
Can you find the heart and two Easter bunnies?

(They're in there somewhere - I promise)


Then we used the cake balls to turn half of the cupcakes into pandas.

Cathleen thought hers looked like an alien.
I disagree. I think it's cute :)

And my attempt.

Then we turned the other half of the cupcakes into Easter baskets.

It was Cathleen's idea to use Twizzlers for the basket handles.
  
 Aren't they adorable?

Alright, I'm off to play with my gum paste tool kit which I proudly bought for 50% off at Michael's. Perhaps I'll show you on Friday what I can conjure with it. Ta-ta!

LinkWithin

Related Posts Plugin for WordPress, Blogger...